
Exporting After Effects to MP4: Easy-to-Follow Steps
This guide provides detailed instructions on exporting an mp4 file in After Effects, presenting both the methods of utilizing and bypassing Media Encoder. It’s important to note that in earlier iterations of After Effects, direct mp4 exports from the Render Queue were not feasible.
Export as an mp4 file without utilizing Media Encoder:
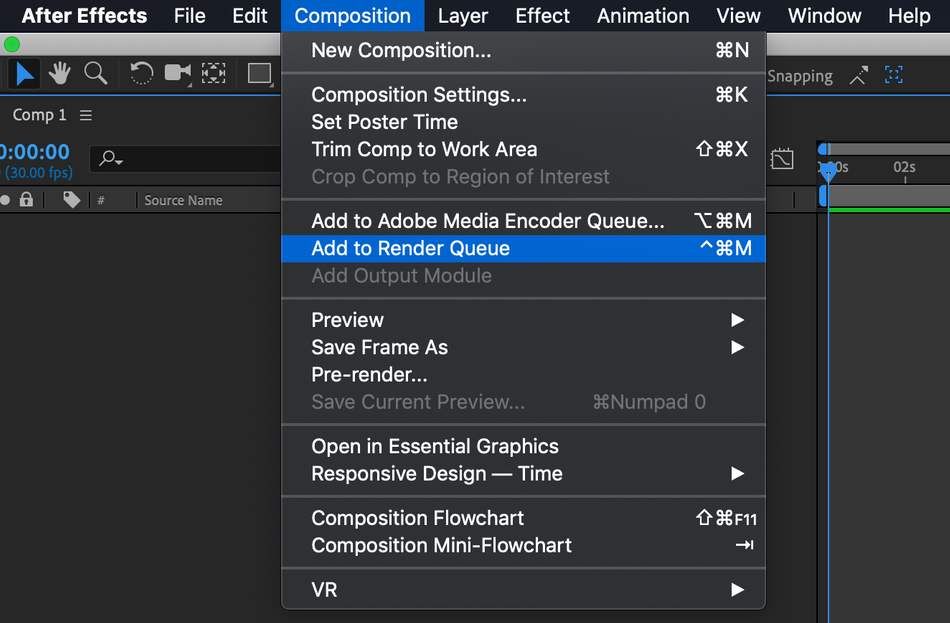
Step 1
Ensuring the composition accurately reflects the provided screenshot, the user proceeds to the Composition menu and selects “Add to Render Queue” or uses the convenient shortcut Ctrl+M.
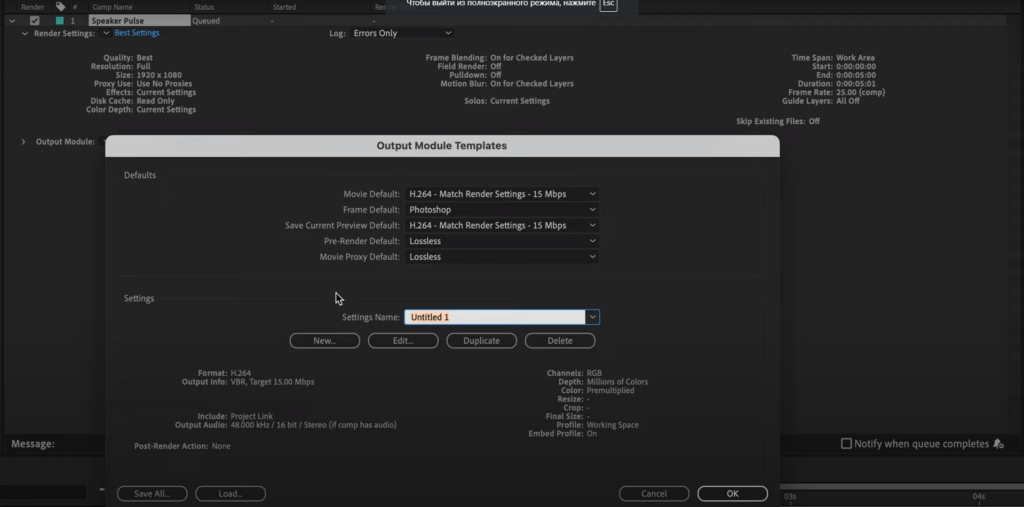
Step 2
Within the Render Queue Tab, the user gains the ability to modify the file format and type by selecting the pertinent Blue Text. In order to export the composition as an mp4 file, the Output Module should be set to H.264. Additionally, the user can define the file’s destination and name by selecting the Blue Text located next to “Output To”.
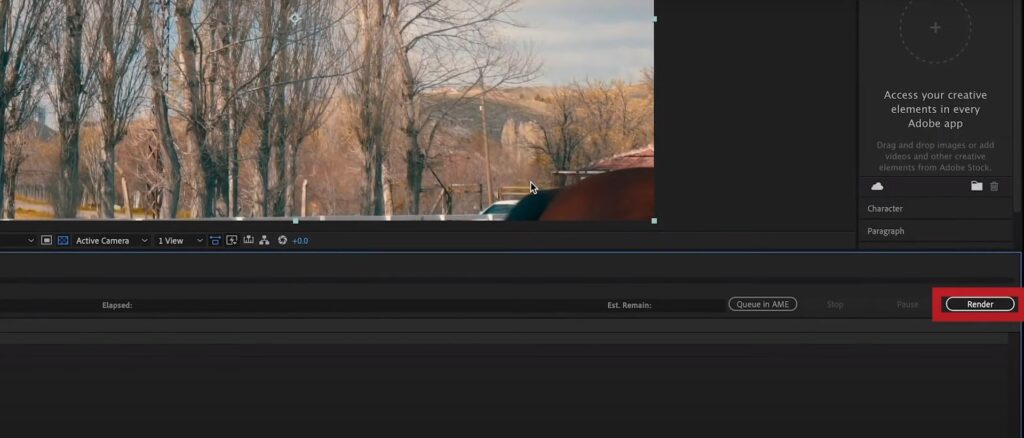
Step 3
After making the necessary adjustments in step 2, the user can initiate the rendering process by simply clicking the Render button located on the right side of the interface.
Following the same initial step of ensuring the composition matches the desired screenshot, the user can proceed to the menu and select “Add to Adobe Media Encode Queue,” or use the time-saving shortcut Ctrl+Alt+M.
- This action triggers the opening of Adobe Media Encoder, which grants the user access to the Output settings by selecting the Blue Text. To render the composition as an mp4 file, it is crucial to verify that H.264 is the selected format;
- Once the adjustments have been made in step 2, the user can commence the rendering and exporting process by pressing the symbol of a green arrow.
Enhanced Guidelines on Exporting After Effects Projects
After Effects, a powerful tool in the realm of video editing and motion graphics, offers various methods for rendering and exporting projects. Understanding these methods is crucial for efficient and effective video production. Below are additional insights and steps to complement the initial guidelines on exporting After Effects projects to MP4 format:
Starting with After Effects
- Understanding the Layout: After Effects has a unique interface that might be daunting at first. Familiarize yourself with the layout to navigate the program efficiently;
- Adding to the Render Queue: To render your video, add your composition to the render queue. This queue acts as a line for compositions waiting to be exported. Navigate to Composition > Add to Render Queue to add your composition;
- Render Settings: Adjust the quality and frame rate of your project in the Render Settings. After Effects optimizes these settings automatically, but you can make manual adjustments if needed.
Adjusting the Output Module
- Choosing the Codec: In the Output Module, you can change the codec of your composition. The default setting is usually QuickTime. For other formats, select “Format Options” and choose from the dropdown menu;
- Selecting RGB or RGB + Alpha: Choose RGB for animations with a background and RGB + Alpha for graphics to be placed over a video;
- Output To: Here, you specify the path where your composition will be saved post-rendering.
Rendering the Composition
- Final Step: Hit the “Render” button on the right side of the screen to start rendering your composition. Once done, verify the render in your file path.
Pre-rendering for Real-Time Playback
- Pre-Render for Preview: To preview your composition in real-time before exporting, use the pre-render option by going to Composition > Pre-render. This step helps in speeding up the final render and export process.
Batch Exporting
- Render Queue for Batch Exports: The render queue allows you to prepare multiple compositions for export, creating a list for batch processing. This is particularly useful for projects with multiple compositions.
Filetype and Audio Settings
- Output Module Settings: Select your filetype format for delivery. The default is Lossless (Quicktime movie with an animation codec). For audio settings, use the dropdown menu in the Output Module to format your audio export.
Utilizing Adobe Media Encoder
- Exporting Through Adobe Media Encoder: For more codec options and settings, use Adobe Media Encoder. You can add your project to the Media Encoder Queue from the Composition menu in After Effects.
Tips for Faster Rendering
- Keep Caps Lock On: This prevents the composition window from refreshing during rendering, speeding up the process;
- Multiprocessing: Enable multiprocessing to use multiple CPU cores for rendering more than one frame at a time;
- Reduce Pre-Comps and Toggle Unused Features: Minimize the use of pre-comps and turn off unused features like motion blur or 3D to reduce render time;
- Selectively Use Effects: Be mindful of the effects used, as some can significantly slow down the rendering process;
- Optimize Compositions: Clean up your compositions by deleting unused layers and trimming layers outside the screen area.
Exporting Specific Formats
- Exporting a GIF: Use Adobe Media Encoder to export a GIF by selecting the Format menu and choosing Animated GIF;
- Exporting & Saving MP4: For MP4 exports, select H.264 as the format in Adobe Media Encoder. Adjust the Bitrate Settings for optimal file size and quality;
- Rendering Alpha Channel (Transparency): For exporting with transparency, choose the Animation codec and select RGB+Alpha in the Output Module settings.
By following these comprehensive instructions, users can effortlessly export their compositions as mp4 files in After Effects, both with and without the need for Media Encoder. We sincerely hope that this guide proves valuable in your endeavors.
To Wrap Up
The ability to export mp4 files directly from the Render Queue in After Effects represents a significant advancement in the software’s capabilities. However, with the latest release in 2023, After Effects has introduced a more intuitive and streamlined process for rendering mp4 files directly from the Render Queue.
- These instructions serve as a valuable resource for users seeking to export their compositions in the popular mp4 file format. Whether they prefer to utilize Media Encoder or bypass it entirely, the steps provided ensure a smooth and efficient export process;
- By offering both methods, users have the flexibility to choose the workflow that best suits their needs. This versatility empowers creators to seamlessly integrate their work with various platforms and devices that commonly support mp4 files.
With After Effects version 2023, exporting mp4 files has become a hassle-free experience, allowing users to focus on their creative vision without being hindered by technical limitations. By following these steps, users can confidently export their animations and projects as high-quality mp4 files, opening up a world of possibilities for sharing and showcasing their work.